Home > Guides > Administrator Guide > xProcesses > xImporting Applicants/Connected Reqs
xImporting Applicants/Connected Reqs
Need Help on this Topic? Email Support
Page Location: Admin > Processes > Import Applicants/Connected Reqs
The Import Applicants/Connected Reqs page provides the ability to import an Excel spreadsheet of data which contains information connecting the Applicants and Requisitions. Generally the process is used history is desired tracking all the requisition with the applicant which applied AND typically this is done if data is already in a format which can easily be exported from another system. This process is not a required process when setting up Cyber Recruiter, but is available to help speed up data entry. If this process is not used, the connections can be manually entered via either (1) Applicant File > Activity Page > Assigned Reqs or (2) Requisition File > Applicants page.
Developing the Spreadsheet
The spreadsheet file can be saved to the computer under any title but the worksheet where the information is listed in the spreadsheet needs to be default name, Sheet1. This name must be typed exactly as shown where the S is capitalize and there is no space between the t and 1. In addition, the file MUST be saved in an .xls format. .XLSX will generate an error and the file will NOT be imported.
Use the COLUMNS to hold the type of necessary information and the ROWS to hold the all the same Applicant information for each Applicant. Understanding the types of information needed helps in building the spreadsheet. The Data Dictionary can help to understand the types of fields used to hold information in Cyber Recruiter better.
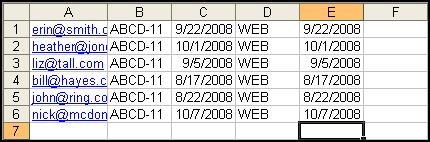
In the example:
- Email (Column A) is the unique Applicant identifier and needs to be the first column in the spreadsheet. Other options for unique Applicant identifiers are Applicant Number, SSN and Misc Fields. This cannot be a new email for a new Applicant that needs to go into the system. Use the Import Applicant process for adding new Applicants, rather Applicants listed in the spreadsheet need to be already entered into the system.
- Requisition Code (Column B) is a pre-determined and Applicant Status per Requisition (Column D) is a code tables in Cyber Recruiter.
- Requisition Code – This cannot be a requisition code for a new requisition that needs to go into the system. Use the Import Requisition process for adding new requisition, rather requisitions listed in the spreadsheet need to be already entered into the system.
- Applicant Status per Requisition – Since the Administrator is able to make Applicant Statuses as needed, this is a user defined code table. Thus the information in this COLUMN needs to be the Applicant Status code NOT the description, depending on how the Administrator entered the code.
IMPORTANT NOTE: When modifying a spreadsheet, be sure to delete ROWS that are not needed instead of doing Edit – Clear Contents. The import will recognize those blank ROWS as blank User information and create a record for it.
Field / Code Mapping
Typically ALL the fields are available in this import are used when importing. The list below is displayed in alphabetical order which is the same way it will appear in the data mapping page in Cyber Recruiter. However, the spreadsheet can have any of these columns in the spreadsheet and don't necessarily have to be in the order listed below. The "Identifier" must be the first column.
When developing the spreadsheet it is important to know that certain fields are hard-coded to only recognize certain values. The list below defines the fields and, if noted, the values which should be used in the spreadsheet as defaults. Use the details below for additional clarification.
| Field |
Purpose |
| Assign Date |
Date the applicant applied for this specific requisition. |
| Identified |
This column works in conjunction with the drop-down on the bottom of the page. Whatever is selected from the drop-down will be used as a verification against the data stored in the spreadsheet in this column. |
| |
Applicant Number |
Unique ID associated with the applicant in Cyber Recruiter. This can be seen in the URL or looked up on the Status/History page.
Generally this field is only used if data is first exported out of Cyber Recruiter, then updated and imported back into the system. |
| |
Email |
Home email address stored on the demographics page of the applicant file. |
| |
SSN |
Social Security number stored on the EEO tab of the demographics page of the applicant file. |
| |
Misc 1 - 20 |
Any one of the applicant miscellaneous fields.
If data was imported from another system and that system has a unique ID, the unique ID could be imported into a misc. field and then used as the unique identifier for this import. |
| Requisition Code |
Req Code associated with the specific requisition. |
| Status |
Code associated with the current status of the applicant related to the requisition. |
| Status Date |
Status date when the current status occurred. |
Importing the File
Use the field lists on the left hand side to Add >> the fields to the right hand side that are in the spreadsheet created to import the Users.
Be sure the fields are listed on the right hand side in the same order the COLUMNS in the spreadsheet are listed use the Move Up and Move Down buttons to rearrange the fields as necessary. If one too many fields are listed on the right hand side use the << Remove button to take the field off.
Once all the fields are selected on the right hand side and they match the order of the fields on the spreadsheet, click the >> Continue button.
Browse to the file to import and press Import to bring the file into the system.
See also
|