Help & Support Center
Search:  
Contents
:
IndexPrintBookmark

Home > Guides > Administrator Guide > Configurable Screens > Requisition - Create Req Form > Main Page

Main Page

Need Help on this Topic? Email Support


Page Location: Admin > Page Builder > Requisition > Create Req Form > Wizard Layout


The Main Page determines how requisition information will be captured on the requisition form which will be passed to the Main Page or the Notes page of the Requisition.
Enter a Title and Instructions for the page so the user knows what to do at this stage of the creation process. Pressing the icon on this page only saves the Title and Instructions. Details about the additional information on the page are saved when editing the menu option selected.

If this is NOT the default wizard template, click on the words Copy from Default Template to make this page mirror the default process already defined. Once copied, all of the settings can be adjusted as needed.

NOTE: If the options to create requisitions from templates or copy existing requisitions will be used, all fields that are defined in the templates or that a user wishes to copy must be present in the create req form or they will not copy over. The fields can be disabled and/or invisible to the user, but they must be present.


Menu Options

The top row of the form includes some instructions messages and the tools to add additional sections to the form.

Message  Purpose 
* = Required Any field marked with a * in the caption (for example: Job Type*) will be a required field when creating a requisition.  This message is just for informational purposes to understand the  page layout.
Red = Disabled And field which appears in red (the other color would be blue) will be disabled when creating a requisition and will NOT allow a user to enter in information.  This message is just for informational purposes to understand the page layout.
Add Row Clicking on this link will add two new spaces for field mapping to the bottom of the form.  Fields can be mapped back to fields found on the Main page of the requisition.
Add Long Question Clicking on this link will add one new spaces for field mapping to the bottom of the form with space to enter in a very long field caption/question. Fields can be mapped back to fields found on the Main page of the requisition.
Add Note Clicking on this link will add a space to map a note. 
Add Line Click on this link will add a line to the form.  This is helpful to break up the page.

Navigation

Before adding components to the page, it is helpful to understand some basic navigation of the page. 
  1. When using the creation page, if the user tabs through the form, the tabbing will first move down the first column before moving to the second column.  Think about this before selecting the order of the fields.
  2. A field cannot appear twice on this page.  If the 'Status' field (for example) is already on the page, it must first be removed before it can be added to an empty mapping slot.
  3. When using the blue arrows to move rows up and down, the arrow moves the whole row, not just one column.
  4. Press the  icon to remove a whole row from the form. 
  5. When moving rows or deleting, the action is taken instantly, there is no undo.
  6. Field names appear in capitol letters in blue or red (depending on if the field is disabled).  Ex: SUPERVISOR
  7. Field captions are what the user will see and they appear between the ( ).  Ex: (Hiring Manager)

Working with Rows

If there is an open slot which can be used for mapping it will appear on the page as [empty]() or [empty]() depending on the disabled status.  If a new row is added, the fields will display as [empty]().  Click on the word [empty] to assign a new mapping or click on a field name to adjust a previously used space.

Field Purpose 
Visible Setting this field to Yes allows the user to see this field when creating the requisition.  Setting this field to No when used with a Default allows for mapping during the creation process of field which are not known or needed from the user. 

For example, add the field 'Auto Open' to the creation form and default in that the field should be 'Yes' which tells the program to follow the posting rules after the approval process.  Set the visible field to 'No' so the field is mapped but the user who is creating the requisition doesn't need to worry about completing that field.
Enabled or Disabled Setting this field to Enabled allows the user to enter information into this field. Leave this field set to Disabled if information should be displayed but should not be changed.

For example, add the field 'Status' to the creation form and default in that the field should be 'Needs Approval'.  Make the field Visible so the user can see the status (if he/she needs to find the requisition later) but Disable the field so the user cannot change the status.
Caption Enter a caption which will explain what information should be entered or selected for this field.
Field Select the field from the drop-down to map this field on the creation page back to the Main page of the requisition.
  Populate With This field will only appear if a Misc field is selected as the Field.  This field allows for a misc field to pull information from the user list. 

For example, if the Misc field represents a team member who will be an interviewer, select to populate the field with a sub-set of the User list so the name will appear consistent.  Options include "All Users", "Recruiters", "Supervisors", "Recruiters and Supervisors".  Depending on which option is selected a different list will appear during the creation process.
Required Select Yes to force the user to enter this information before moving to the next page.
Default Depending on the field selected, this field will change.  Enter or select something ONLY if the value should default to new requisitions. 

Drop-down options = Select from the list provided  based on the field selected.
Fill-in = Enter any text which should be populated to the field.
Date = Enter the text CurrentDate to indicate that the field should populate with the current date based on when the requisition is added.


Working with Long Questions

Use the 'Add Long Question' option if the caption assigned is longer than 50 characters.  The field operates like the field above but is accessed slightly differently.  If a new row is added for a Long Question, the fields will display as (no caption).  Click on the words to assign a new mapping or click on a field name to adjust a previously used space.

Field Purpose 
Visible Setting this field to Yes allows the user to see this field when creating the requisition.  Setting this field to No when used with a Default allows for mapping during the creation process of field which are not known or needed from the user. 
Enabled or Disabled Setting this field to Enabled allows the user to enter information into this field. Leave this field set to Disabled if information should be displayed but should not be changed.
Caption Enter a caption which will explain what information should be entered or selected for this field.
Field Select the field from the drop-down to map this field on the creation page back to the Main page of the requisition.
Required Select Yes to force the user to enter this information before moving to the next page.
Default Depending on the field selected, this field will change.  Enter or select something ONLY if the value should default to new requisitions. 

Drop-down options = Select from the list provided  based on the field selected.
Fill-in = Enter any text which should be populated to the field.

Working with Notes

Use the 'Add Note' option to connect a field back to a note and to provide space for a very long text answer.  Generally this would be used to capture additional notes related to the requisition parameters.  If a new row is added for a note, the fields will display as (no caption).  Click on the words to assign a new mapping or click on a field name to adjust a previously used space.

Field Purpose 
Enabled or Disabled Setting this field to Enabled allows the user to enter information into this field. Leave this field set to Disabled if information should be displayed but should not be changed.
Caption Enter a caption which will explain what information should be entered or selected for this field.
Note Type Select which note type should be assigned to this note for future reference.
Required Select Yes to force the user to enter this information before moving to the next page.
Default Enter or select something ONLY if the value should default to new requisitions. 

Available Fields

The following fields can be used for mapping using the Add Row or Add Long Question option. 

Field  Maps to ... Information 
Req Code "Code" (typically automatically assigned).
Position Title "Job Title" saved to the Main page.
ApplyToURL

Prompts for the main URL for the careers site.


NOTE: This path should be to the starting page of the careers site and does not need the 'careers.aspx' page reference. 

  • NOTE: If this field is pivotal.  If this field is not correct, job descriptions will not display.  This field should be set to required so there is no change of opening a requisition without the URL listed.  If the field is not filled in, the job will not go to job posting sites the potential applicants cannot apply to the job.
Openings Prompts for the user to enter a number related to the open slots which should be filled for this position.  Maps to the "Openings" saved to the General tab of the Main page.
Direct Prompts user for a Yes or No related to the billing status of the requisition.  Maps to "Direct" saved to the Job Info tab of the Main page.
EEO Class Prompts user for a selection based on the code setup.  Maps to "EEO Classification" saved to the Job Info tab of the Main page.
Exempt Prompts user for a Yes or No related to the overtime status of the requisition.  Maps to "Exempt" saved to the Job Info tab of the Main page.
Job Category

Prompts user for a selection based on the code setup. Maps to "Job Type" saved to the Job Info tab of the Main page.

  • NOTE: If this field is used and the system is posting to Indeed and sending the "Category". It is recommended that this field be set to required so there is no change of opening a requisition missing information.
Full Time/Part Time

Prompts user for a selection based on the code setup. Maps to "Full Time/Part Time" saved to the Job Info tab of the Main page.

  • NOTE: If this field is used and the system is posting to Indeed and sending the "Job Type". It is recommended that this field be set to required so there is no change of opening a requisition missing information.
Supervisor Prompts user for a selection based on the user list.  Anyone classified as a "Supervisor" in the user account will appear in this drop-down.  Maps to "Supervisor" saved to the General tab of the Main page.
Recruiter Prompts user for a selection based on the user list. Anyone classified as a "Supervisor" in the user account will appear in this drop-down. Maps to "Recruiter" saved to the General tab of the Main page.
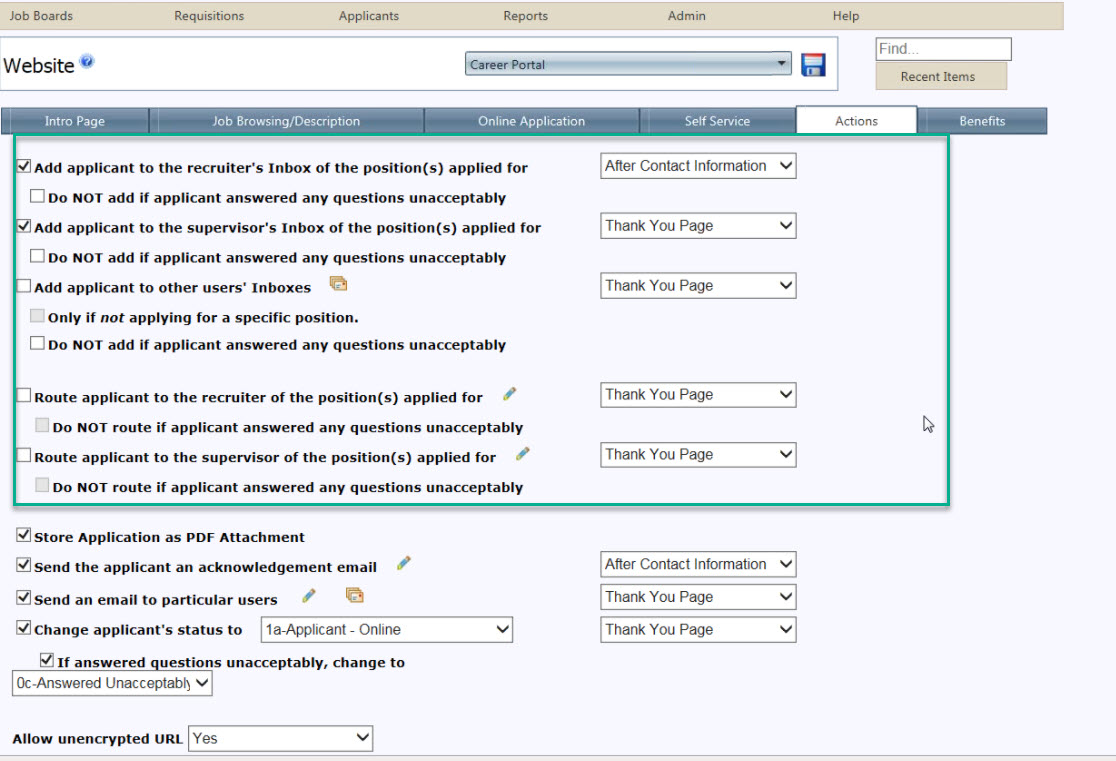
Skip Recruiter

Prompts the user to enter a selection for the Skip Recruiter field which will allow an individual position to bypass the defaults settings defined in the website configuration evaluation of the applicant. Please note that this only applies to the settings highlighted in the image below:

Status Prompts for a selection based on the code setup.  Maps to "Status" saved to the General tab of the Main page.
Status Date "Status Date" saved to the General tab of the Main page. 
Organizational Levels (1-5) Prompts for a selection based on the code setup. Maps to the Organizational field values saved to the Job Info tab of the Main page.

NOTE: These fields should NOT be included on this form if the Organizational page is activated.
Open Date Capture the date the requisition was opened. It is used to calculate the time-to-fill. Maps to "Open Date" saved to the General tab of the Main page.

NOTE: This field should NOT be included on this form if Posting Rules are being used.
Requested Date Captures the date the requisition was requested.  This can be used when doing a "Find" for the requisition. Maps to the "Requested Date" saved to the General tab of the Main page.
Date Posted Externally Captures the date the requisition should be posted externally. Maps to "Date Posted Externally" saved to the General tab of the Main page.

NOTE: This field should NOT be included on this form if Posting Rules are being used.
Date Posted Internally Captures the date the requisition should be posted internally. Maps to "Date Posted Internally" saved to the General tab of the Main page.

NOTE: This field should NOT be included on this form if Posting Rules are being used.  If this field is used, the Date Posted Externally should also be used.
Remove Posting Date Captures the date the requisition should be posted internally. Maps to "Remove Posting" saved to the General tab of the Main page

NOTE: This field should NOT be included on this form if Posting Rules are being used.
Date Needed Captures the desired start date of the employee.  Maps to the "Date Needed" saved to the General tab of the Main page.
From Salary

Captures the minimum target salary for the requisition.  Maps to "Salary From" saved to the Job Info tab of the Main page.

  • NOTE: If this field is used and the system is posting to Indeed and sending the "Salary". It is recommended that this field be set to required so there is no change of opening a requisition missing information.
To Salary

Captures the maximum target salary for the requisition. Maps to "Salary To" saved to the Job Info tab of the Main page.

  • NOTE: If this field is used and the system is posting to Indeed and sending the "Salary". It is recommended that this field be set to required so there is no change of opening a requisition missing information.
Salary Grade Prompts for a selection based on the code setup. Maps to "Salary Grade" saved to the Job Info tab of the Main page.

NOTE: The Salary Grade field can automatically assign the From Salary and To Salary fields during the creation process.  If all three fields are used, the Salary Grade will NOT overwrite the values entered during the creation process.
Reason Open Prompts for a selection based on the code setup. Maps to "Reason Open" saved to the General tab of the Main page. 
Person Replacing Captures the name of the employee who currently is employed in this position.  Maps to "Employee Replacing" saved to the General tab of the Main page.
Functional Title Prompts for a selection based on the code setup. Maps to "Functional Title" saved to the Job Info tab of the Main page.
Auto Open Prompts user for a Yes or No related to the automation of opening the requisition after the approval process. Maps to "Auto Open" saved to the General tab of the Main page.
Application Template Prompts for a selection based on the setup. Maps to "Application Template" saved to the General tab of the Main page.
Street 1 Prompts for the primary street address for this position.  
Street 2 Prompts for the secondary street address (Suite, for example) for this position.  
City

Prompts for the city for this position. 

  • NOTE: If this field is used and the system is posting to Indeed. It is recommended that this field be set to required so there is no change of opening a requisition without the city listed.  If the field is not filled in, the job will not go to Indeed.
State

Prompts for the state for this position. 

  • NOTE: If this field is used and the system is posting to Indeed. It is recommended that this field be set to required so there is no change of opening a requisition without the state listed.  If the field is not filled in, the job will not go to Indeed.
County Prompts for the County for the position.
Country

Prompts for the Country for this position. 

  • NOTE: If this field is used and the system is posting to Indeed. It is recommended that this field be set to required so there is no change of opening a requisition without the country listed.  If the field is not filled in, the job will not go to Indeed.
Zip Code

Prompts for the zip code for this position.  

  • NOTE: If this field is used and the system is posting to Indeed and sending the "Postal Code". It is recommended that this field be set to required so there is no change of opening a requisition missing information.
Apply To URL

Prompts for the main URL for the careers site.


NOTE: This path should be to the starting page of the careers site and does not need the 'careers.aspx' page reference. 

  • NOTE: If this field is used and the system is posting to Indeed, ZipRecruiter or the Refer a Friend feature is in use, it is recommended that this field be set to required so there is no change of opening a requisition without the URL listed.  If the field is not filled in, the job will not go to Indeed or ZipRecruiter and potential applicants will not have a way to review the job description.
Miscellaneous Fields (1-20) Miscellaneous field values saved to the Misc. tab of the Main page.


See also